This blog post is part of a series of blog posts for Azure Back to school https://azurebacktoschool.tech by Dwayne Natwick. For the whole of September different community members will be creating a blog post or video to about Azure. Mine as you can tell from the heading is about Azure Kubernetes Service (AKS). In this blog post I am going to show you how to set up an AKS cluster using the new managed Azure Active Directory Integration. This means you do not have to create service principals and App registrations; the AKS resource provider does this for you! But before we can start to build the cluster, we have some known limitations and prerequisites.
Known Limitations
- The first one is it only works in regions where AKS is supported. This means you can’t run do this in:
- Azure Government
- Azure China 21Vianet
- Once enabled you cannot disable it.
- Only Role Based Access Controlled (RBAC) clusters are supported.
- You are unable to change the Azure AD Tenant associated with your AKS cluster.
Prerequisites
You will need Azure CLI version 2.9.0 or later and Kubectl version 1.18 or newer (this is client, not server)
To install the latest kubectl version in your terminal window (bash) use the following command.
sudo az aks install-cli
kubectl version --client
You will also need an Azure AD group. This group will be used as the admin group for the cluster. It will be used as the cluster admin group. You can use an existing group or create a new one. You will need the object ID of the Azure AD group you want to use. You can find it by using the following command, just replace the aks-admin with the displayname of your group.
az ad group list --filter "displayname eq 'aks-admin'"Code language: PHP (php)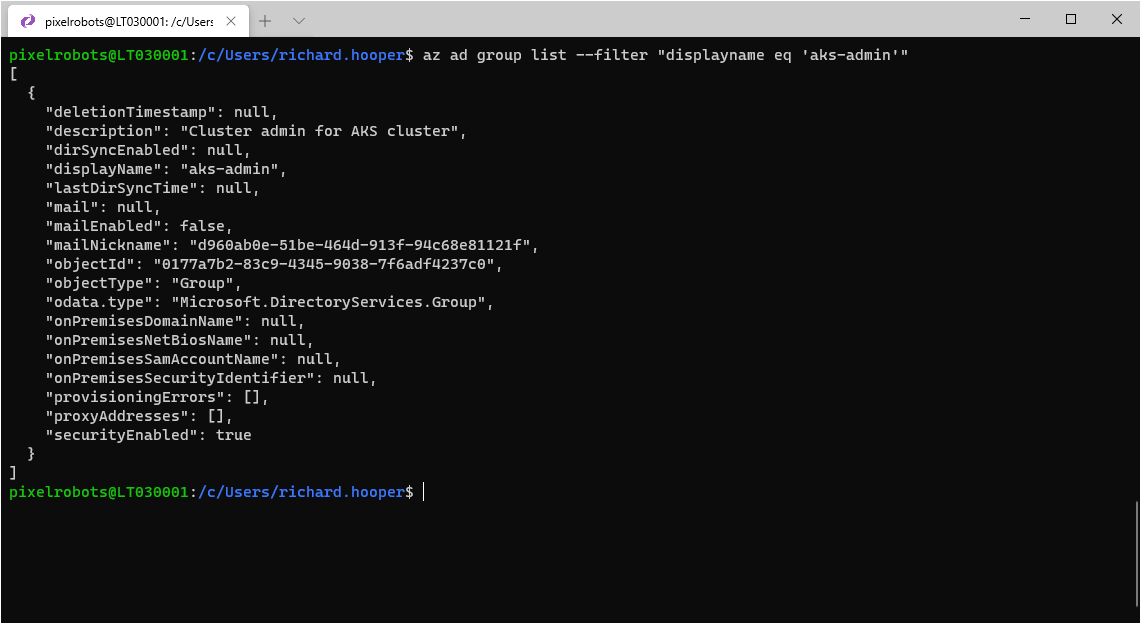
Take a note of the ObjectId, you will need it later.
If you would like to create a new group, you can use the following command.
az ad group create --display-name AKSAdminGroup --mail-nickname AKSAdminGroup
You will also need the Tenant ID. To find that you can use the following command.
az account show --query tenantId --output tsv
Time to create the AKS cluster!
First, we need to create an Azure resource group to do that just use the following command and switch out the names to something you like.
az group create --name AzureBackToSchool --location EastUS
Now it’s time to create the AKS cluster and enabled the administrator access with the group from before. You will need to add your group and tenant ID’s from before
az aks create -g AzureBackToSchool -n ManagedCluster --enable-aad --aad-admin-group-object-ids <id> --aad-tenant-id <id>Code language: HTML, XML (xml)
After about 6 minutes or so, you should have you AKS cluster. You can then start to access it.
How to Access the AKS cluster
To access the cluster, you will first need to use the az aks get-credentials command and point it to your newly created cluster.
az aks get-credentials --resource-group AzureBackToSchool --name ManagedClusterCode language: JavaScript (javascript)
Now use kubectl to get a list of the nodes in the cluster.
kubectl get nodesCode language: JavaScript (javascript)
You will be asked to sign in. Go to the URL and enter the code shown in your terminal window. Sign in with a user from the group before. Back in the terminal window you will see the nodes in your AKS cluster.

And there you have it! You have now created an AKS cluster without having to manually create a service principal or app registrations. I really like what Microsoft has done with this. It makes creating AKS clusters a lot easier. You can also update an existing RBAC enabled cluster. I will show you how in another guide, so keep an eye out.
If you have any questions or comments please reach out to me using the usual methods.


0 Comments