In this blog article, I am going to walk through how to create Plans, Quotas, Offers, and Tenants in Azure Stack. This is one of the first things you are going to need to do after you have installed Azure Stack.
How To Create A Plan and Quota
What is a plan? Well, a plan is a way for the Azure stack admin to create limits on what your tenants can utilize. It’s just like the plans you can get in Azure. MSDN, Trial Accounts, Microsoft Partner Plans, etc. So now we know what a plan is, let’s create one.
First login to your Azure Stack Administrator console on your host machine. https://adminportal.local.azurestack.external/
Click the green + and then Search for Plans
Click Plan

Click Create

Enter a Display Name (what the tenant sees) and a Resource Name this will be populated for you. You can change if you like.
Create a new Resource Group or use an existing if you have one.

Click on Services a new blade will slide out. Select which services you want this plan to have. Then click Select

Click Quotas. A new blade will slide out.

You will see we have 3 places where we can set Quotas. Compute, Network, and Storage.
Let’s create a quota for Compute. Click on Microsoft.Compute (local) A new blade will slide out.

Click Create new quota
Enter a Name and then change the other settings to your needs. And then click OK

Select the Quota.
Repeat the above steps to create quotas for Microsoft.Network (local) and Microsoft.Storage (local)
Once the other two quotas have been made click OK

Now click Create

You have now created a plan. You can view it under All Resources

Create An Offer
What is an Offer? Offers are basically groups of one or more Plans that you, the Azure Stack administrator presents to the tenants to subscribe to.
First login to your Azure Stack Administrator console on your host machine. https://adminportal.local.azurestack.external/
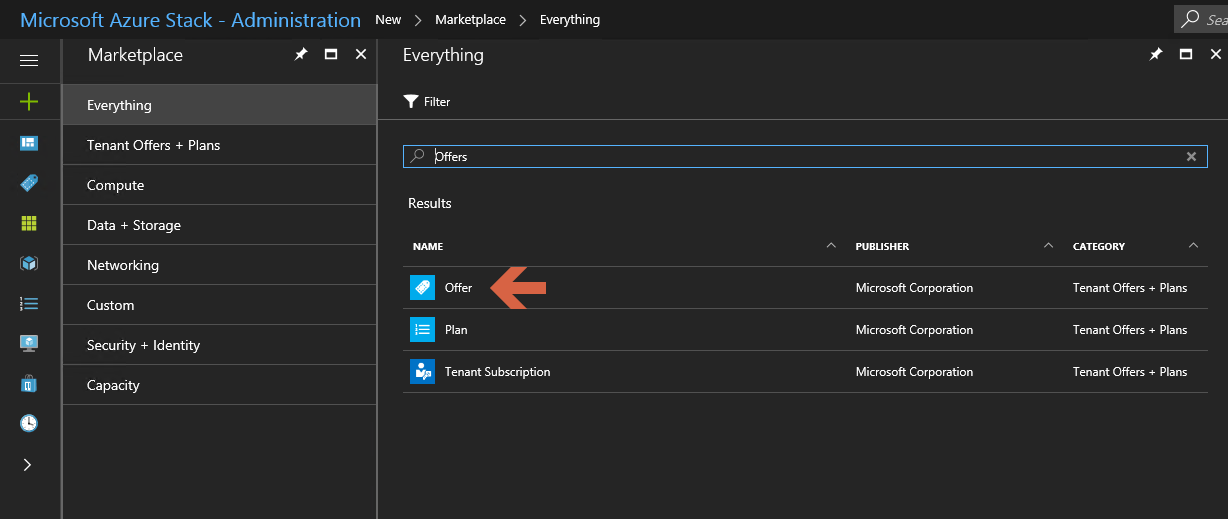
Click the green + and then Search for Offers
Click Offer
Click Create

Enter a Display Name and a Resource Name if you are not happy with the auto generated one.
Select a Provider Subscription if you have more than one.
You can either Create a new Resource Group or use an existing.

Now click on Base plans a new blade will slide out. Select the plan you want to use. And then click Select

Click Create

You have now created an Offer, but tenants will not be able to subscribe to it until the offer is made public.
To do this navigate to All Resources and search for your newly created Offer and click it.

Click Change State

Select Public
The offer is now ready to be used by a Tenant.
Create And Assign A Tenant
What is a Tenant? A Tenant is basically a user. This user will be a user inside your Azure Active Directory you use to set up Azure Stack.
Create a Tenant
Log in to your Azure Active Directory https://aad.portal.azure.com/
Click Users and Groups

Click All Users and then click Add user

Enter a Name and a User Name
Select any other properties you would like to set.
Make sure you take a note of the generated password.
Then click Create

You have now created a Tenant
Assign A Tenant
Navigate back to your Azure Stack administrator portal. https://adminportal.local.azurestack.external/
Click the green + and then Search for Tenant
Click Tenant Subscription

Click Create

Enter a Display Name and enter the user name we just created in the User box.
Select a Subscription if you have more than one.
Then click on Offer

Select the Offer you want this tenant to have access to.

Click Create

You have now created a Tenant and assigned it to an Offer.
The Tennant will now be able to login to the Azure Stack Portal and create VM’s, Network and Storage.
https://portal.local.azurestack.external/

I hope you found this article helpful. I will be creating more articles soon on how to create use Azure Stack as a tenant, so I hope you come back to read them
As always any questions please leave a comment.


0 Comments