Now that the Azure Stack Developer Kit has been released I thought it was about time I updated my TP3 install. My TP3 install was on a physical host (HPE DL360 g7). To me, this was a waste of that server. I am no developer so I had no need for it to be running all the time so I decided to reinstall Windows Server 2016, Install the Hyper-V role and just run Azure Stack as a VM utilising the new feature, Nested Virtualization.
In this guide, I am going to explain what I did to get Azure Stack Developer Kit to run as a VM. I will not go into the details of how to create the initial VM as I am sure you are able to do that if you are reading this guide. I will show you the configuration of my VM though.
Prerequires
You will need a Server capable of running a Virtual machine with at least:
12 vCPU’s
96GB of Ram
At least 4 VHD’s with a minimum capacity of 140GB
Your physical server also needs Hyper-V installed with SLAT support.
You will also have downloaded the Azure Stack Developer Kit from here and extracted the CloudBuilder.vhdx file.
You also will need an Azure AD account with Global Administrator rights
VM Configuration
The first thing we need to do is add the CloudBuilder.vhdx to your Azure Stack VM and set it as the boot device.
We will also need to increase the size of the vhd to at least 300GB.
Now we need to create and Add at least 4 vhd’s each with a minimum capacity of 140GB.
You should now have your VM looking something like this.

Lastly, we need to untick the time synchronization check box in the integration Services tab in the VM settings. We have to do this due to Azure Stack installer needed to sync to an external time source.

Now we need to enable Nested Virtualization for this VM.
This can be done in an Elevated PowerShell window with the following code.
| Set-VMProcessor -VMName PIXEL-AZURES-01 -ExposeVirtualizationExtensions $true |

Changing the VM name to match yours.
Install Azure Stack Developer Kit
VM Installation
Now we have everything ready to go, so let’s start the installation.
Start up the VM and connect to it using Hyper-V Manager. After a short while, you should have a screen asking you to fill in some information. This is because we have not used the PrepareBootFromVHD.ps1 script you are required to run when installing Azure Stack Developer Kit on a physical server.

Change the settings to what you need and click Next

Enter a Product Key. As we are running a VM you can use the AVMA key. Check here for them. Then click Next

Agree to the licence terms by clicking Accept

Enter a password you would like to use. Make sure you remember this. Then click Finish
The VM will restart.
Log on to the VM using the Password from before and check that you have network connectivity.
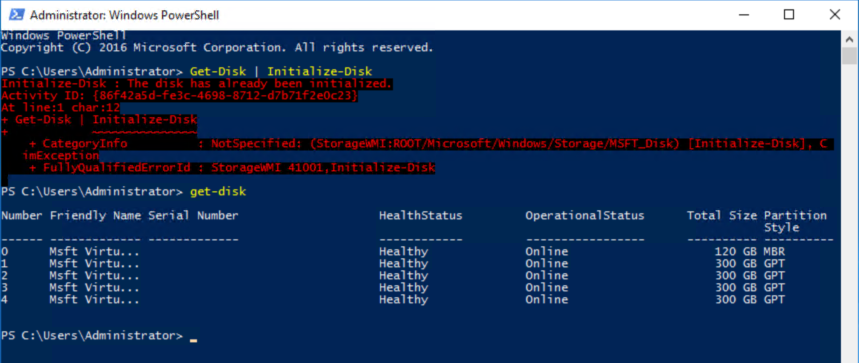
Now we will need to use PowerShell to initialize the for disks by using the following cmdlet.
| Get-Disk | Initialize-Disk |
Ignore the error. That’s just the OS disk.
Script Manipulation
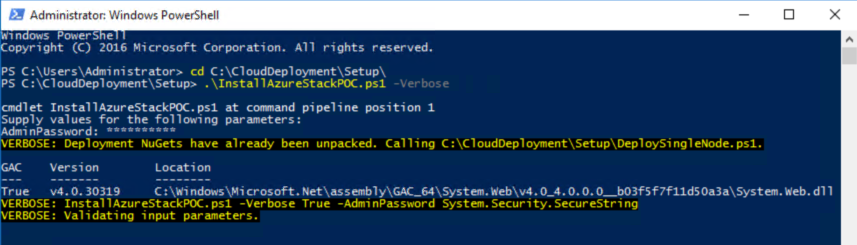
First we need to run the InstallAzureStackPOC.ps1 script to download some more script files
In an elevated PowerShell window run the following cmdlet.
| cd C:\CloudDeployment\Setup | |
| .\InstallAzureStackPOC.ps1 -Verbose |
Entering the Admin Password when prompted

The Installation will run for a bit and then fail. This is expected.
Now we need to edit the BareMetal.Tests.ps1 script to allow the installation to work on a VM.
Open PowerShell ISE as an Administrator and then open the BareMetal.Tests.ps1 script from C:\CloudDeployment\Roles\PhysicalMachines\Tests folder.
Do a find for $isVirtualizedDeployment and remove the -not from before each variable (it should be in there 3 times).

Save the changes
Installing Azure Stack Developer Kit
In an elevated PowerShell window run the following cmdlet.
| cd C:\CloudDeployment\Setup | |
| .\InstallAzureStackPOC.ps1 -Verbose |
Entering the admin password again
We now need to enter our Azure AD Global Admin credentials

If you have more than one tenant you will need to re run the cmdlet adding the -InfraAzureDirectoryTenantName “pixelrobots.co.uk” parameter but with your tenant name
Now sit back and relax. You Azure Stack Developer Kit will install. This can take a very long time depending on your server setup.
You may get some errors along the way. This could be down to it just being slow on a VM. When I got the errors I just reran the install by using the following PowerShell command.
| cd C:\CloudDeployment\Setup | |
| .\InstallAzureStackPOC.ps1 -rerun -Verbose |
Connect to Portal
So the installation has finally finished, but how do I connect to the Azure Stack Portal.
Well, that’s easy. You RDP to VM you created to host Azure Stack. Then open up IE and navigate to
https://portal.local.azurestack.external/ to access the Portal. Signing with a user account from the Azure Active Directory.

To Access the Administrator Portal in IE on the Host VM navigates to https://adminportal.local.azurestack.external/. Use your Azure Active Directory credentials you specified during the installation.

[/themify_box]
I hope you have found this blog post helpful. If you have any questions please leave a comment.

0 Comments