In this article I am going to show you how to build a Role Based Access Controlled (RBAC) Azure Kubernetes Services (AKS) cluster using Terraform and Azure Active Directory. At the time of writing this article, when you create an AKS cluster using the portal or terraform RBAC is disabled by default. Luckily since version 1.19.0 of the AzureRM Terraform provider RBAC is supported.
You can find all the files used at the following GitHub repository.
I have also created a video that some people may find useful.
Prerequisites
Before you can set up your new AKS cluster you need to make sure you
You will also need a Service Principal. You can read my article, First look at T
An Azure Storage account with a container and an Access Key to store your Terraform state file. Look at this guide on how to do this.
An SSH key for the Linux VMs for your AKS cluster. You can read more about creating them here. Just make sure you have it saved in the same path that’s stated in the variables terraform file.
Creating the Azure Active Directory applications
AKS with RBAC needs two applications created in Azure AD. The first one is a Server application, the second is a client application. We will use the Azure portal to create them.
Note
You can use the same Server application for multiple AKS clusters, but it is recommended to use one Client application per cluster.
Create the Server application
This application is used to get a users Azure AD group membership.
In the Azure Portal navigate to Azure Active Directory and then click on App registrations and click New application registration.

In here we need to enter a Name and make sure the Application type is Web app / API. In the Sign-on URL enter any web address. I am using my domain name. Then click Create.

In the new blade click on Manifest.

In here we need to edit the

Now Click on Settings and then click on Keys.

Now enter a Description for the key and select when you would like it to Expire. Then click Save.

Take a copy of the Value. We will need it later when we create the AKS cluster. The value is referred to as the Server application secret.
Warning
You will not be able to get this value again if you leave this blade. Make sure you copy it.
Now click on Required permissions In this blade click on + add.

Click Select an API then Microsoft Graph, then click Select.
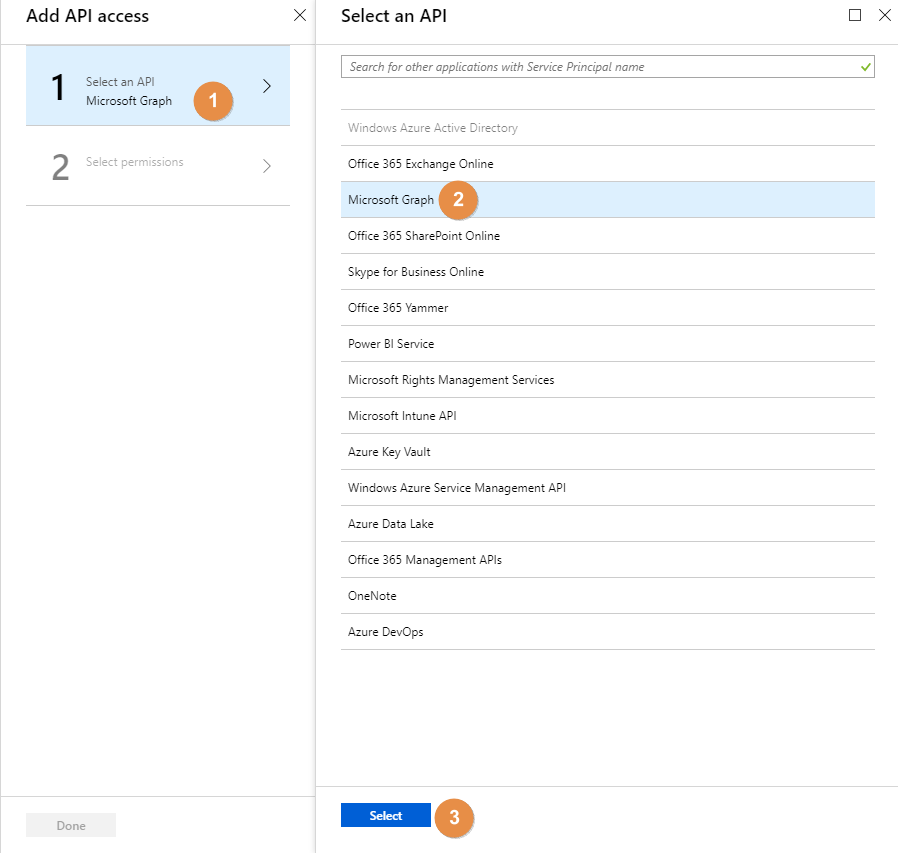
Under Application permissions put a tick next to Read Directory Data.

Scroll down further to Delegated permissions. Under here put a tick next to Sign in and read user profile. Then click Select. In the next blade click Done.

Now we have to Grant admin consent. All we a have to do is click the button.

Click Yes.

Take a note of the Application ID we will need it for later.

Create the Client application
This application is used when logging in using the Kubectl the Kubernetes CLI.
Navigate back to the Azure Active Directory blade again and click on App registrations. Create a new one again.
Enter a Name and then under Application type select Native. Add a Redirect URI again I have used my domain. Then click Create.

Now click on Settings and click Required permissions. In here click on Add.

Click on Select an API. In the search box enter the name of the Server application we just created. Click it and then click Select.

Put a tick next to Access AKSRBAC. (the AKSRBAC is your server application name.) Then click Select. IN the next blade click Done.

Now we have to Grant admin consent. All we a have to do is click the button and then click Yes.

Now take a note of the Application ID. This will be the Client application ID.

Get the Tenant ID
Now we need to get the Tenant ID. This is easy. Just go back to Azure Active Directory in the Azure portal and click on Properties. In here you will see the Tenant ID.

You should now have a set of IDs like the ones I do below.
Deploying the Cluster with Terraform.
Now its time to deploy the AKS cluster using terraform.
First we need to edit the variables.tf file from the GitHub repo with the right names and values for your environment. We will need to also add our IDs we have from above along with our Service Principal details.
Now its time to initialize Terraform. First, we need to update the backend
You will need to login to your Azure subscription first use:

Lets test our Terraform files to see what will happen. We use the plan option for this.
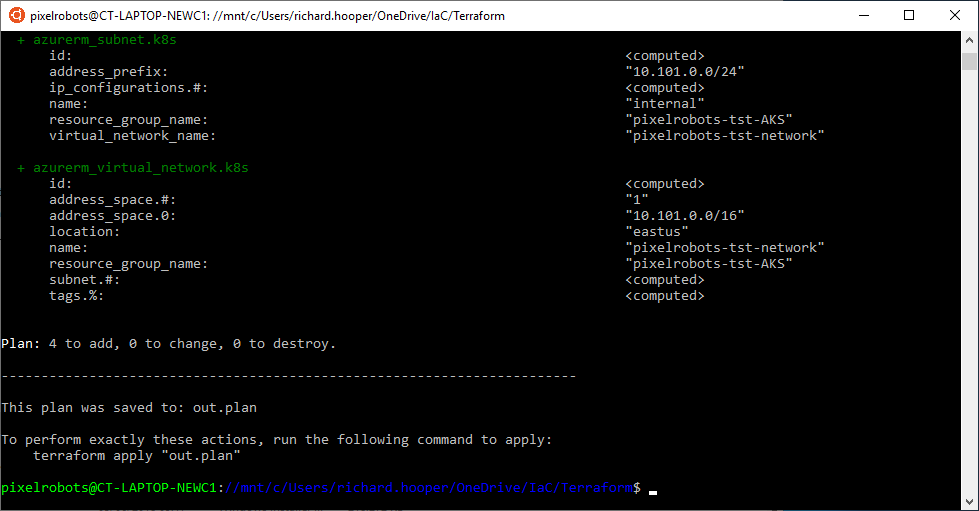
Everything looks good. 4 items are going to be created. Now its time to actually apply the configuration. To do that just run:
It’s going to take some time to build everything. Maybe 20 minutes or more. You might want to go get a cup of tea.

Configuring Kubernetes RBAC
That’s the cluster deployed! Now its time for us to configure RBAC. To do this we need to create Cluster Role Binding and a Cluster Role using a YAML file. But first, we need to connect to Kubernetes cluster as an admin. Use the following command to do that. Just change the resource group and name to match yours.

In the Git repo under the k8s folder, you will find two YAML files one to add a user the other for a group. The user one is easy. You just change the email address at the bottom. For the group one, you will need to go into Azure AD and get the Group Object ID. Once you have the .yaml file you want to use. Make sure you are in the directory with the files and then type the following to apply it.

Connect to the cluster using RBAC
Now that we have configured the cluster for RBAC its time to connect to it. Let’s get some non-admin credentials first.
Lets use kubectl to see what nodes we have.
You will notice it is asking us to sign in to the Azure portal. Go ahead and do it.

As you can see you can see the two nodes in the cluster. And that’s it. You now have an RBAC AKS cluster. If you have any questions please reach out.


4 Comments
andrew fryer · April 3, 2019 at 1:38 pm
Excellent work, you shoudl be wrtiign our documentation!
Pixel Robots. · April 3, 2019 at 2:03 pm
Thanks for the kind words!
Edward Pius · May 2, 2019 at 4:21 pm
This is really good how-to guide. I used this to spin up my K8S cluster successfully using RBAC. Thanks a lot!
Pixel Robots. · May 2, 2019 at 4:22 pm
Thanks for the kind words. I am glad it helped!