In this article, I am going to show you how to setup Microsoft Azure Service Health to send notifications to Microsoft Teams when there are issues with your Azure resources in your subscriptions. Now you could just look at the Azure health status page https://azure.microsoft.com/en-us/status/ and then view your personalised dashboard (Which takes you to the Azure Service Health service), but then you would have to keep the page open and actively look at it. It’s so much easier to just be notified by using Microsoft Teams. So let’s get started.
Prerequisites
The easiest way to send Azure notifications to Microsoft Teams is by the use of an email address. Luckily for us, you get an email address for each channel in Teams.
Get an Email Address
Navigate to the channel you want the alerts going to. In my case, I have a team called infrastructure and then a channel called alerts. Once there click on the … next to the channel name and then click Get email address.

A window will popup with the email address in. Click Copy to copy the email address to your clipboard and close this window. Paste the email address to a safe place. If you do lose it you can always get it back by clicking Get email address again.

Now you have the email address we can set up Azure to send the notifications to this Microsoft Teams Channel.
Azure Set up
Log in to your Azure Subscription by going to https://portal.azure.com
Click All Services and type Service Health. In the search results click on Service Health

Now click on Create service health alert

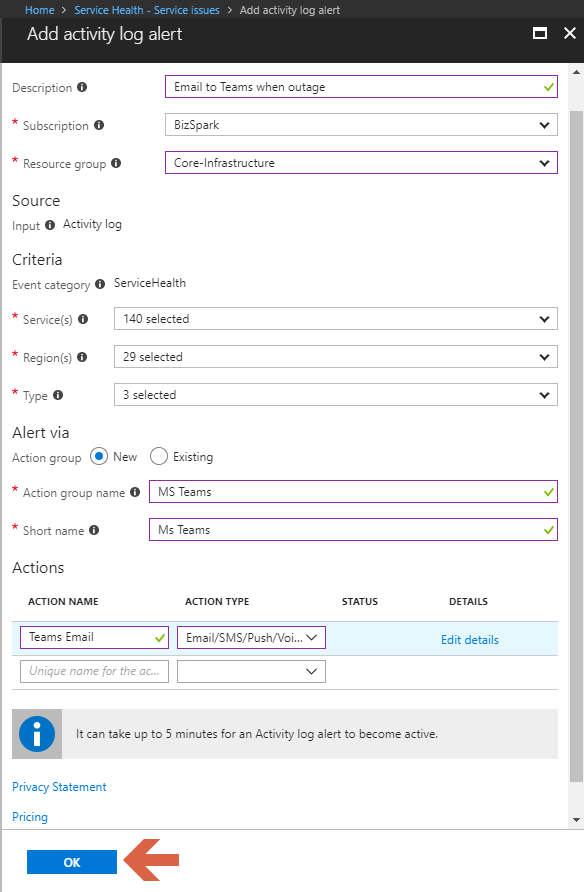
You will now have the Add activity log alert blade.

Enter an Activity log alert name and Discerption. Pick the Subscription you would like this alert rule to be active for. You can then either leave the Resource group as the default, which will create a new one called Default-ActivityLogAlerts or use an existing resource group.
You now have 3 options under the Criteria section. You can leave the defaults if you like or you can customise it to your needs. What I like to do is use the Select all feature on Services, Regions, and Type. I do this because then I don’t have to create a new rule for a different region, service etc. every time I add new resources to my Azure subscription. One thing you may notice is that by default only the regions you are using in your subscription are selected by default.
You should now have something like the below image.

Now its time to fill in the Alert via section. If this is your first time setting up activity log alerts then select New.
For Action group name use something that is unique to the resource group. As this alert is sending to Microsoft Teams I have used MS Teams.
Now for the Actions. Enter a Name for the action and then under type select Email/SMS/Push/Voice. A new blade will appear. If the blade does not appear then click Edit details.

Tick the Email Box and then enter the email you have saved from earlier. Then click OK

Now click OK to finish creating the rule. As noted it can take up to 5 minutes for the rule to become active.
You will now go back to the default Service Health Blade. To view, your new alert click on Health alerts

Here you will be able to see any alerts you have created, edit the existing ones, disable or delete an alert, and see when they last fired. Unfortunately, as of writing this article, there is not an option to test an alert. Hopefully, this will come one day.

That’s it. You have now created an Azure service health alert and set to email a Channel in Microsoft Teams. How cool is that! If you have more than one subscription, make sure you set up rules for them too.
I hope you found this article helpful and if you have any questions leave a comment below, or reach out to me on social media or email. Thanks for reading.


0 Comments